Important
Novacta.Shfb.LatexTools Documentation
Getting started with Novacta.Shfb.LatexTools, version 1.0.0
Installing the LatexTools
Install a supported version of SHFB
Version 1.0.0 of the LatexTools targets SHFB, versions 2021.10.23.0 to 2022.2.6.0.
Make sure that a supported SHFB version of your choice is currently installed on your host machine.
You can download the required SHFB release here.
Install a full LaTeX distribution
You need a full TeX distribution installed on your host machine. You can find a list of TeX implementations here.
Create a SHFB documentation project
Documentation projects can be created via the SHFB standalone GUI, or via the SHFB Visual Studio package.
Add the Latex Tools to the SHFB documentation project
Right click on node Component Packages of your project and, from the contextual menu, select Manage Component Packages... (if your are using the SHFB standalone GUI), or Manage NuGet Packages... (if you are inside Visual Studio). Hence search package Novacta.Shfb.LatexTools and install it.
This way, a reference to the Novacta.Shfb.LatexTools NuGet package will be added to your documentation project, and the following SHFB extensions will be available while processing help files.
The Novacta.Shfb.LatexComponent enables the representation of LaTeX equations as images in SHFB documentation topics. Supported image formats are PNG and SVG.
The Novacta.Shfb.LatexPlugIn supports the SVG image file format for the MSHelpViewer help output.
The presentation styles VS2010 + Latex and VS2013 + Latex, which add the ability to manage LaTeX content to styles VS2010 and VS2013, respectively.
Using the LatexTools
Selecting a LaTeX-aware presentation style
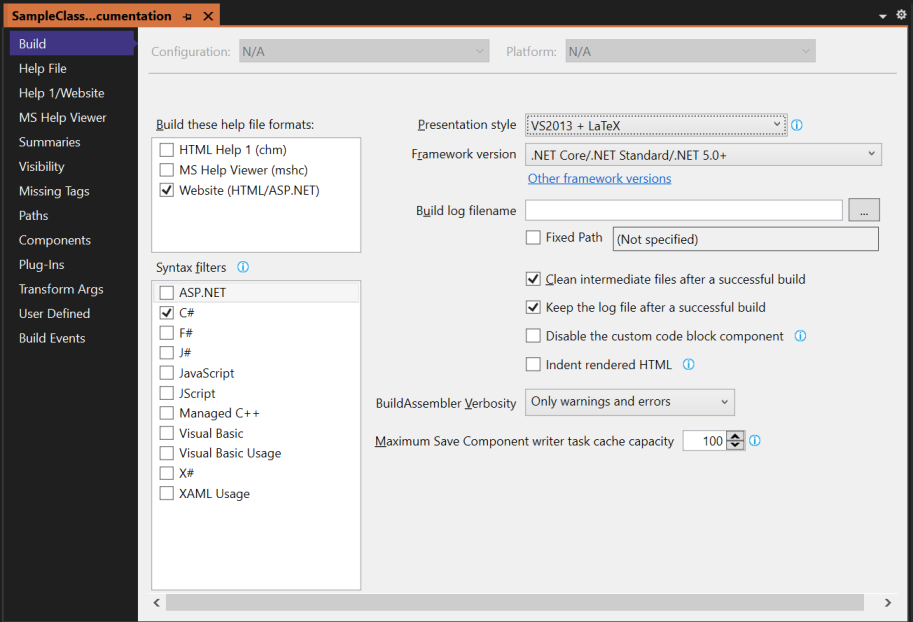
To select a presentation style able to manage LaTeX content, open the project properties and click on the Build tab. From the list of available presentation styles, select the one of your choice among those defined as VS2010 + LaTeX or VS2010 + LaTeX. For example, the following figure shows a project in which the VS2013 + LaTeX style has been selected.
Adding and configuring the LatexComponent
The Novacta.Shfb.LatexComponent must be added to a documentation project in order to manage LaTeX content in documentation topics.
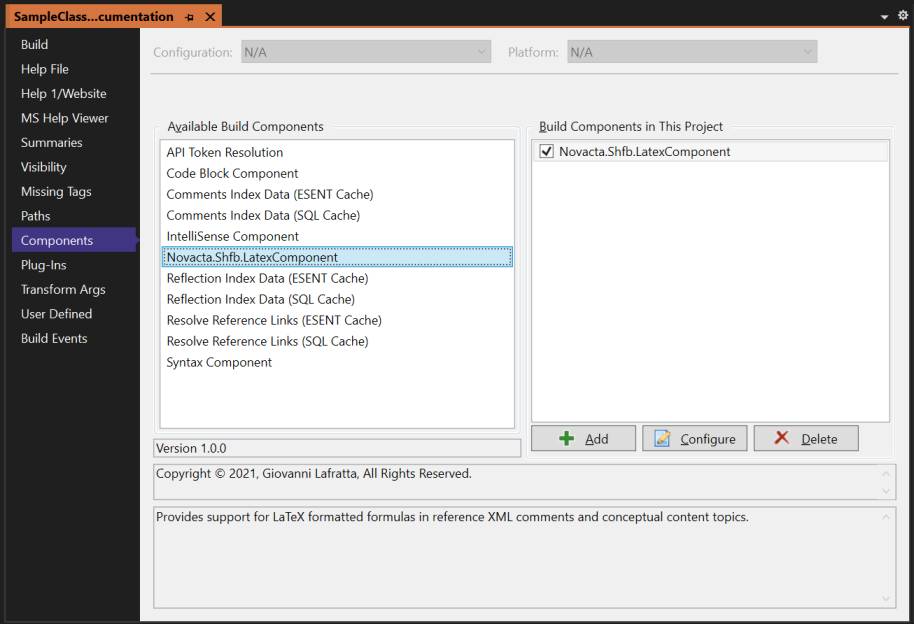
To such purpose, open the project properties and click on the Components tab. From the list of available components, select the one referred to as Novacta.Shfb.LatexComponent and click the Add button. Now the Latex component is inserted in the list of the components executed during the build process of the documentation project. Such list is showed on the right side of the tab, as exemplified in the following figure.
Once the LaTeX component has been committed for execution, it must be configured. By clicking the Configure button, the following pop-up window will be displayed.
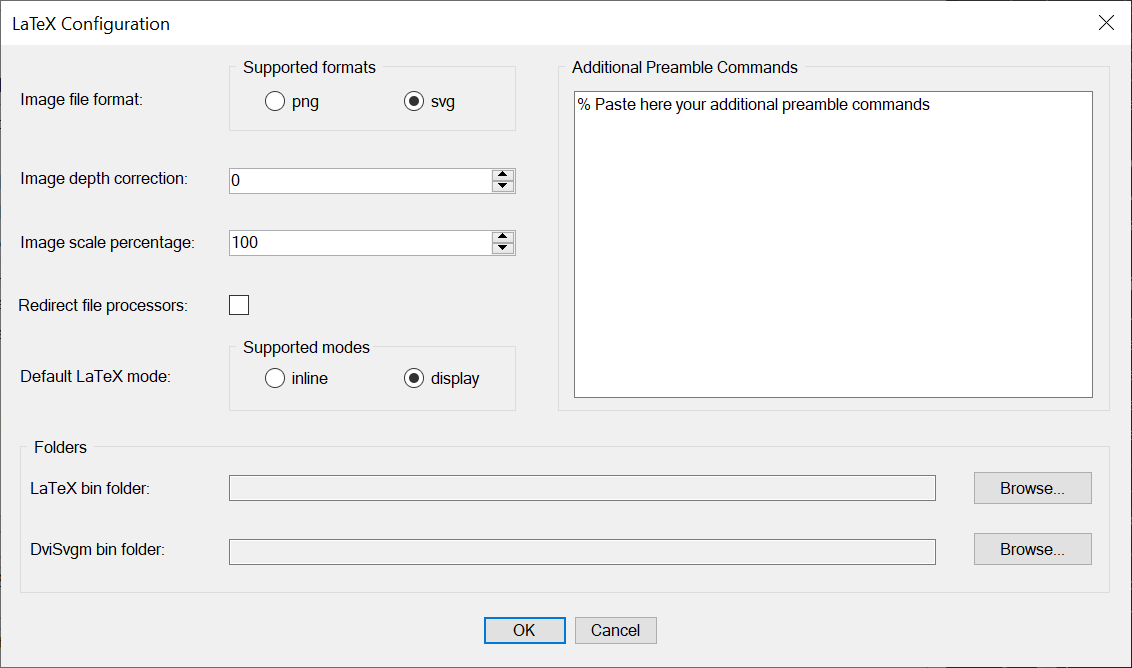
Through that window, configuration options can be set as follows.
LatexComponent Configuration
Option | Description |
|---|---|
Image file format | Through this option, one of the image formats supported for LaTeX content representation can be selected. |
Image depth correction | When a LaTeX element is in-lined, then the corresponding image depth, i.e. the distance of the bottom of the image from its baseline, must be modified in order for the text represented in the image to have the same baseline of the surrounding text. The initial image depth is returned by the DviPng executable of the LaTeX distribution. Then, the difference between such value and that set for the Image Depth Correction option is taken as the final image depth. By default, the Image Depth Correction option is set to 0, a value that works well for the default text size. Such behavior can be overridden for each specific equation, as discussed in the following section. |
Image scale percentage | This option controls the size of the text in a LaTeX equation. The default value is 100, and is equivalent to apply the \normalsize text sizing LaTeX command while adopting 10pt as the size of the main font in the document. Values other than 100 modify the size, but negative values are not allowed. Such behavior can be overridden for each specific equation, as discussed in the following section. |
Redirect file processors | If checked, this option enables the redirection of LaTeX console outputs to the SHFB Help Build Log Content. |
Default LaTeX Mode | This option controls if a LaTeX equation must be interpreted, by default, as entered in inline mode, or in display mode. The default configuration sets this option to display. Such behavior can be overridden for each specific equation, as discussed in the following section. |
Additional Preamble Commands | If needed, this option enables the addition of specific commands to the preamble of the documents processed to get the LaTeX equations required in the documentation. |
LaTeX bin folder | Through this option, you can specify the folder where are contained the binary files of the installed LaTeX distribution. |
DviSvgm bin folder | Through this option, you can specify the folder where are contained the binary files of DviSvgm, a converter of DVI files to the SVG graphics format. The converter has been added to several LaTeX distributions. If the installed distribution includes the tool, you can specify here the same path set for option LaTeX bin folder. Otherwise, you can download the converter here, save it in a folder and set the option accordingly. These binaries are only needed if you select the SVG image file format. |
The LatexPlugIn
The Novacta.Shfb.LatexPlugIn must be added to a documentation project only if the project needs to support the SVG image file format for the MSHelpViewer help output.
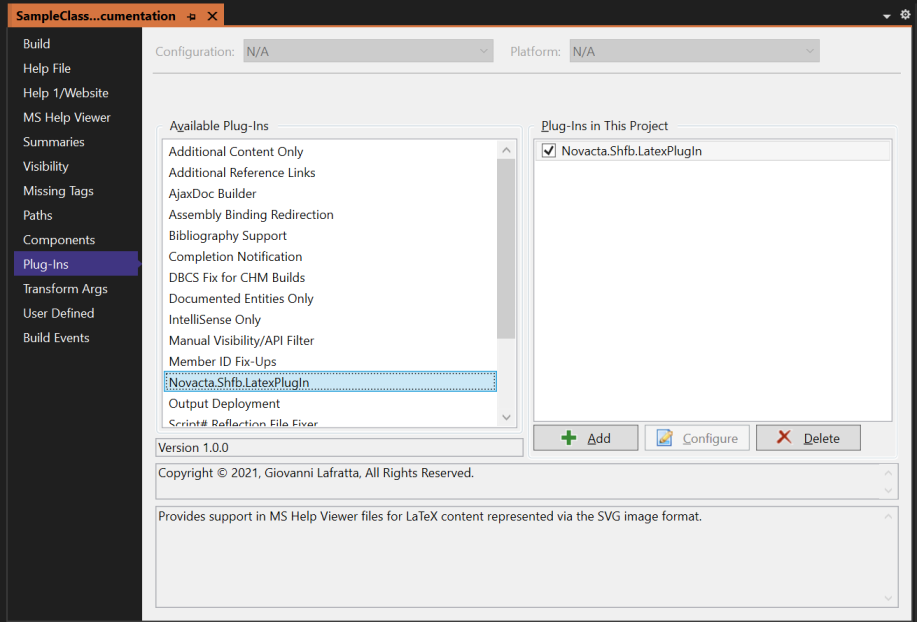
To do so, open the project properties and click on the Plug-Ins tab. From the list of available plug-ins, select the one referred to as Novacta.Shfb.LatexPlugIn and click the Add button. Now the Latex plug-in is inserted in the list of the plug-ins executed during the build process of the documentation project. The plug-ins committed for execution are listed on the right side of the tab, as exemplified in the following figure.
Adding LaTeX equations in XML comments
LaTeX equations can be added to the XML comments on your source code by inserting custom XML elements, referred to as the LaTeX elements.
The start-tag of such elements is <latex>. The basic form of a LaTeX element, i.e. a form with no XML attributes, is as follows.
XML
<latex>X_{(0)}=2^{-1/3}</latex>When <latex> elements are processed, their content is interpreted as having document class article, with an option of 10pt for the size of the main font in the document, and the \pagestyle set to empty. You can also assume as loaded packages amsmath and amsfonts. Also, package preview is loaded with options active, textmath, and displaymath enabled.
When the default configuration is active and the latex element is in basic form, then its content is interpreted as inserted in a displayed mathematical environment (separated by the main text), and sized applying the \normalsize LaTeX command.
Such behavior can be overridden by adding attributes to the latex element or overriding the default configuration.
If you want a LaTeX formula displayed in-line, that is, within the body of text where it is declared, you can add a mode attribute having the "inline" value, as in the following example.
C#
/// Let us assume that the random variable
/// <latex mode="inline">Y_{i}</latex> has distribution function
/// <latex mode="inline">F_{Y_{i}}</latex>.
If a LaTeX element has no mode attribute, then its mode is set, by default, according to the Default LaTeX mode configuration option.
The Novacta.Shfb.LatexComponent inserts images in help files to represent your equations. When a LaTeX element is in-lined, then the corresponding image depth is, by default, set according to the Image depth correction configuration option. However, the image depth for a given LaTeX element can be hard coded by adding a depth attribute, as in the following example.
XML
<latex depth="10">F_{Y_{i}}</latex>In a LaTeX element, the size of the text is controlled, by default, through the Image scale percentage configuration option. However, the size of a given LaTeX element can be overridden by adding to it a scale attribute. For example, if you want its size being the 70% of the basic size, you can write a LaTeX element as follows.
XML
<latex scale="scriptsize">F_{Y_{i}}</latex>More thoroughly, you can set the value of the scale attribute using any of the predefined values shown in the following table, where the corresponding percentages are also reported.
Scaling LaTeX Equations
Predefined LaTeX size | Percentage | Example |
|---|---|---|
tiny | 50 |
|
scriptsize | 70 |
|
footnotesize | 80 |
|
small | 90 |
|
normalsize | 100 |
|
large | 120 |
|
Large | 144 |
|
LARGE | 172.8 |
|
huge | 207.4 |
|
Huge | 248.8 |
|


As an example, the following file printout shows the source code for type IntegerOperation, as defined in project SampleClassLibrary:
SampleClassLibrary\IntegerOperation.cs
1
2
3
4
5
6
7
8
9
10
11
12
13
14
15
16
17
18
19
20
21
22
23
24
25
26
27
28
29
30
31
32
33
34
35
36
37
38
39
40
41
42
43
44
45
46
47
48
49
50
51
52
53
54
55
56
57
58
59
60
61
62
63
64
65
66
67
68
69
70
71
72
73
74
75
76
77
78
79
80
81
82
83
84
using System;

namespace SampleClassLibrary
{
    /// <summary>
    /// Provides a method to operate on integers.
    /// </summary>
    public static class IntegerOperation
    {
        /// <summary>
        /// Applies the specified function to the given operand.
        /// </summary>
        /// <param name="func">The function.</param>
        /// <param name="operand">The operand.</param>
        /// <returns>The result of the operation.</returns>
        /// <exception cref="ArgumentNullException">
        /// <paramref name="func"/> is <b>null</b>.</exception>
        /// <example>
        /// <para>
        /// In the following example, the applied function, say
        /// <latex mode='inline'>f:\mathbb{N}\rightarrow \mathbb{N},</latex> is defined as
        /// <latex mode='display'>
        /// \forall n \in \mathbb{N}: n \mapsto f\left(n\right)=n^2.
        /// </latex>
        /// An integer is thus squared
        /// executing the <see cref="Operate(Func{int, int}, int)"/> method.
        /// In addition, input validation is also checked.
        /// </para>
        /// <para>
        /// <code language="cs">
        /// using System;
        /// namespace SampleClassLibrary.CodeExamples
        /// {
        ///     public class IntegerOperationExample
        ///     {
        ///         public void Main()
        ///         {
        ///             // Define an operator that squares its operand
        ///             Func<![CDATA[<]]>int, int> square = (int operand) => operand * operand;
        ///
        ///             // Define an operand
        ///             int integer = 2;
        ///
        ///             // Operate on it
        ///             Console.WriteLine("Squaring {0}...", integer);
        ///             int result = IntegerOperation.Operate(square, integer);
        ///             Console.WriteLine("...the result is {0}.", result);
        ///
        ///             // Check that an operator cannot be null
        ///             try
        ///             {
        ///                 IntegerOperation.Operate(null, 0);
        ///             }
        ///             catch (Exception e)
        ///             {
        ///                 Console.WriteLine();
        ///                 Console.WriteLine("Cannot apply a null function:");
        ///                 Console.WriteLine(e.Message);
        ///             }
        ///         }
        ///     }
        /// }
        ///
        /// // Executing method Main() produces the following output:
        /// //
        /// // Squaring 2...
        /// // ...the result is 4.
        /// //
        /// // Cannot apply a null function:
        /// // Value cannot be null.
        /// // Parameter name: func
        /// </code>
        /// </para>
        /// </example>
        public static int Operate(Func<int, int> func, int operand)
        {
            if (func==null)
            {
                throw new ArgumentNullException(nameof(func));
            }
            return func(operand);
        }
    }
}
Note the LaTeX elements at line 21-24 in the XML comments on method Operate. You can check here how the corresponding documentation looks like.
Adding LaTeX equations in conceptual topics
Elements in MAML conceptual topics must be qualified using a namespace. To qualify LaTeX elements, add to the topic's document element a namespace attribute associated with prefix ltx, as shown in the following example.
XML
<topic id="303c996a-2911-4c08-b492-6496c82b3edb" revisionNumber="1">
  <!-- This element name will change based on the document type -->
  <developerConceptualDocument
    xmlns="http://ddue.schemas.microsoft.com/authoring/2003/5"
    xmlns:xlink="http://www.w3.org/1999/xlink"
    xmlns:ltx="http://www.novacta.net/2018/XSL/ShfbLatexTools">

    <!-- The content goes here -->

  </developerConceptualDocument>
</topic>
Now LaTeX elements can be added by prefixing their tags with ltx, as follows.
XML
<ltx:latex scale="LARGE" mode="inline">X_{(0)}</ltx:latex>As an example, the following file printout shows the source code for a conceptual topic about IntegerOperation, as defined in project SampleClassLibrary:
SampleClassLibrary.Documentation\Content\OperatingOnIntegers.aml
1
2
3
4
5
6
7
8
9
10
11
12
13
14
15
16
17
18
19
20
21
22
23
24
25
26
27
28
29
30
31
32
33
34
35
36
37
<?xml version="1.0" encoding="utf-8"?>
<topic id="b10d4d75-3729-4247-a58a-b9e5b6e4bb4d" revisionNumber="1">
  <developerConceptualDocument
    xmlns="http://ddue.schemas.microsoft.com/authoring/2003/5"
    xmlns:xlink="http://www.w3.org/1999/xlink"
    xmlns:ltx="http://www.novacta.net/2018/XSL/ShfbLatexTools">

    <introduction>
      <para>
        Class <codeEntityReference qualifyHint="false">
          T:SampleClassLibrary.IntegerOperation
        </codeEntityReference> provides method
        <codeEntityReference qualifyHint="false">
          M:SampleClassLibrary.IntegerOperation.Operate(System.Func{System.Int32,System.Int32},System.Int32)
        </codeEntityReference>
        to manage operations on integer values.
      </para>
      <para>
        In the following example, an integer is squared
        executing the <codeEntityReference qualifyHint="false">
          M:SampleClassLibrary.IntegerOperation.Operate(System.Func{System.Int32,System.Int32},System.Int32)
        </codeEntityReference> method.
        This is equivalent to define the applied function,
        say <ltx:latex mode="inline">f:\mathbb{N}\rightarrow \mathbb{N},</ltx:latex>
        as <ltx:latex>\forall n \in \mathbb{N}: n \mapsto f\left(n\right)=n^2.</ltx:latex>
        In addition, input validation is also checked.
      </para>
      <code source="..\SampleClassLibrary\IntegerOperationExample.cs.txt"
        language="cs" title="C#" />
    </introduction>

    <relatedTopics>
      <link xlink:href="4c3871a5-d7c6-477c-96ee-e71f0a67f7a8" />
    </relatedTopics>

  </developerConceptualDocument>
</topic>
Note the LaTeX elements at lines 24-25. You can check here how such conceptual topic looks like.